Frequently Asked Questions and Tutorial Videos for Your ArchReach Account
Find your answer below or reach out to support@architectsmarketing.com.
Getting Started
See below for most common questions about getting started with ArchReach.
ArchReach System Overview
How to login to my account?
To access your ArchReach account, you will need:
- url for your account. It looks like this: yourcompanyname.archreach.com
- password
- Open a new tab in your web browser and put in your account url and press the "enter" or "return" key on your keyboard. You'll see the login screen.
- Enter your email address OR the word "admin".
- Enter in your password
- Click the login button
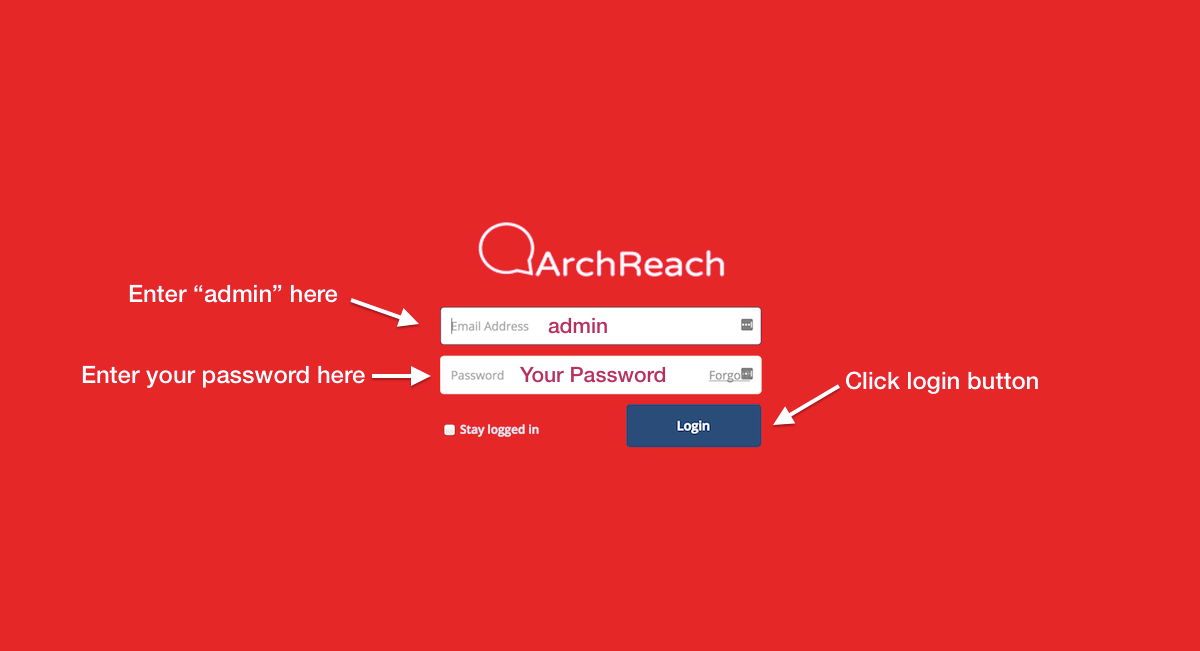
screenshot of how to login to your AR account.
How to add users to my account?
To add new users to your ArchReach account:
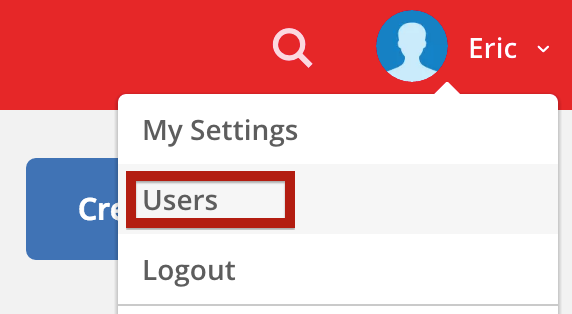
- Log in to your account and hover over your name in the upper right corner
- In the dropdown that appears, click on "users"
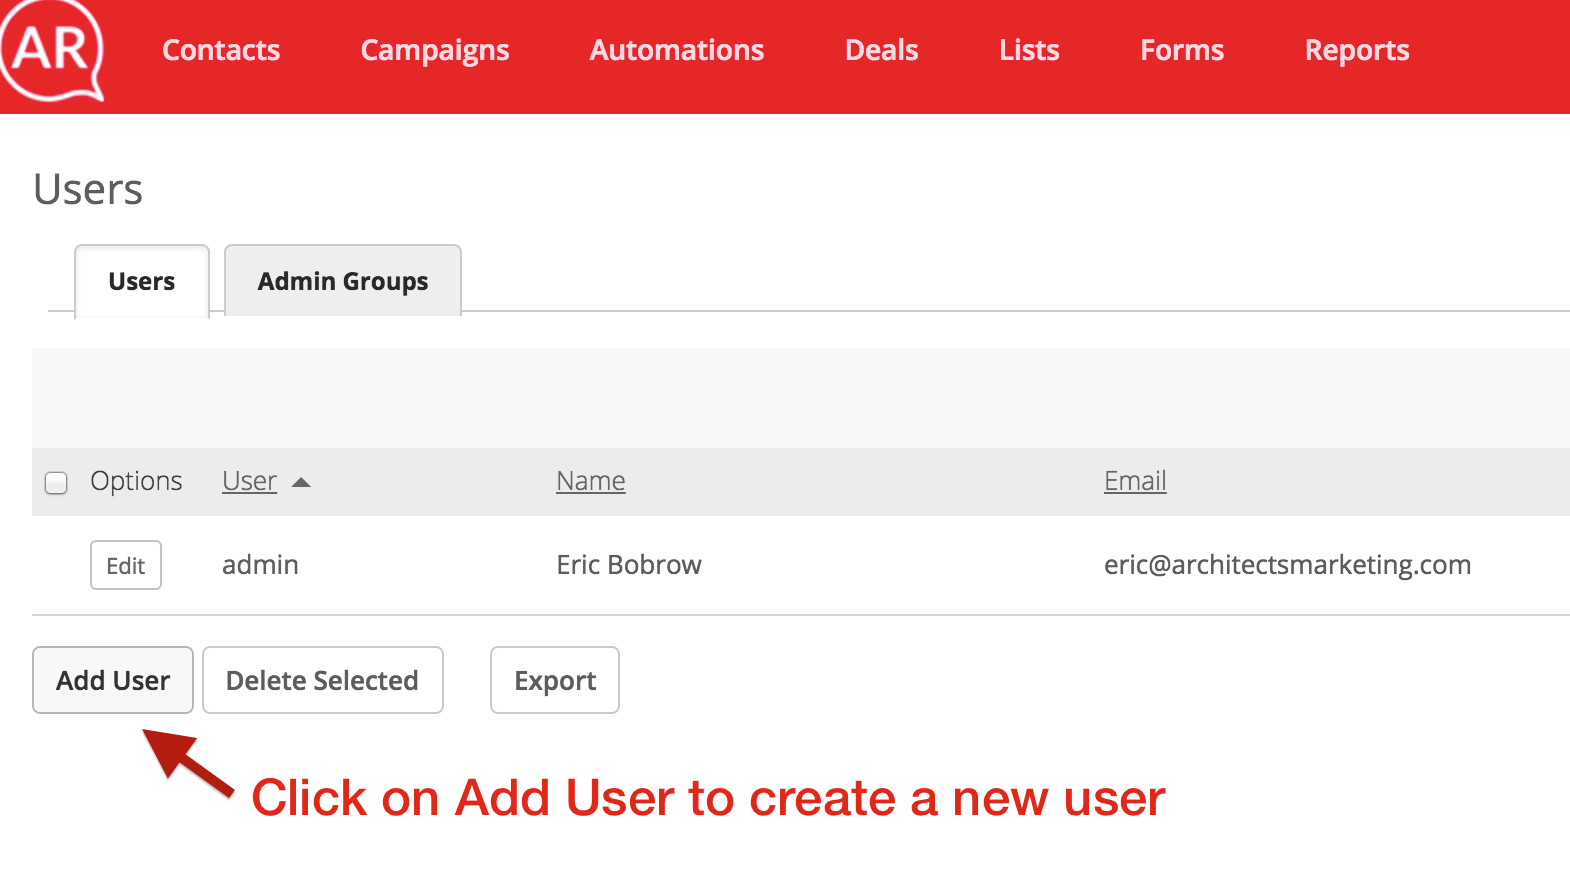
- On the next screen, click on "Add User".
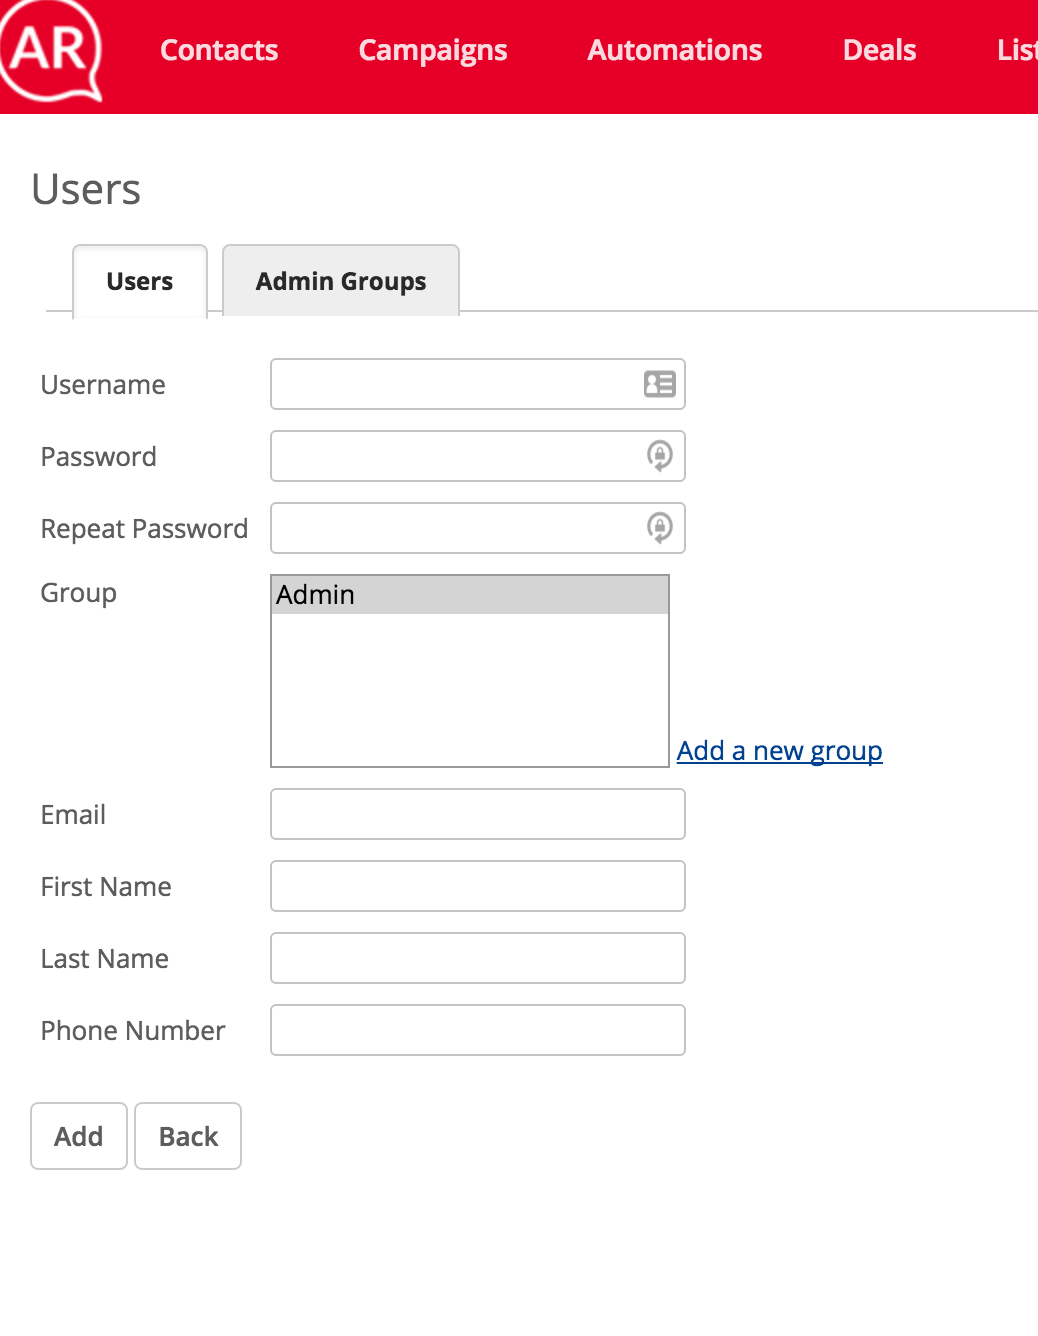
- Complete the fields, adding in the information for the new user. Then click "Add" at the bottom.
- That's it! You now have added a new user to your account.
How to import contacts?
How to create a .csv file?
"CSV" stands for "Comma Separated Values".
Here are the steps for creating a "CSV file" of your contacts for importing into your ArchReach account:
- Create a new, blank workbook in Microsoft Excel or Apple Numbers
- In the first row of the workbook, but the field names you will be using for your contact records (note that at minimum, each contact record needs to contain an email address).

- Next, populate the following rows with your contacts' information. Put each contact on a separate row. If you are missing some information for a contact, leave the cell blank:

- Lastly, save the file as a "CSV" format file.
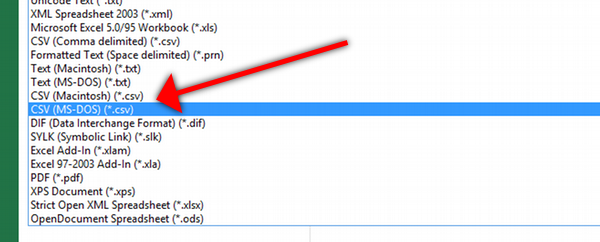
- Now you are ready to import this CSV file into your ArchReach account.
How to update or change my business contact information?
If you need to change or update your business address within your ArchReach account, this is what you need to do:
Where to find settings for your AR account.
- Log in to your account. Click on your name in top right corner and go to My Settings. See above image.
- Change your company details on this page and be sure to update the information in the signature box. Click the green Save Settings button when you're done making changes.
- Now go to Lists and then next to one of your lists, click on the down arrow next to "Import Contacts" to reveal a dropdown menu. Then click on Edit.
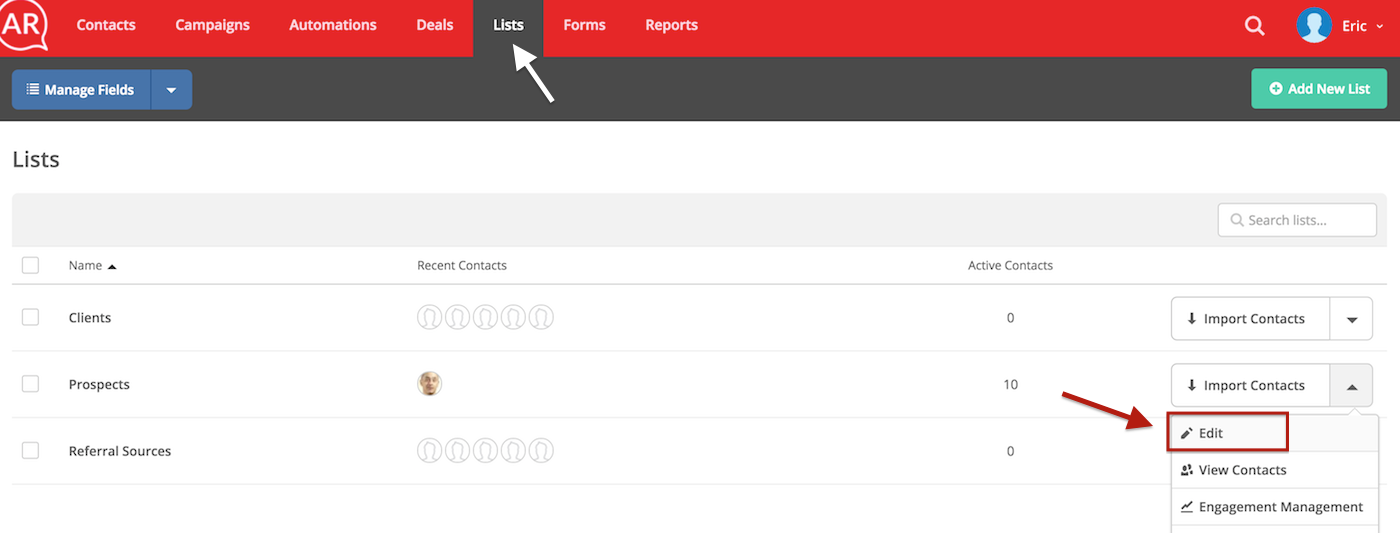
Go to Lists to change business contact information in your emails.
- In the window that pops up, check that the sender address is correct. If not, click on the address and you'll see an option to Add new address. Choose Add new Address.
- Now you'll be able to add in new address details. (Remember you don't need to do this if the address is correct in step #4.)
- Click Create List.
- Do steps #3-6 for each mailing list.
- The other place you'll need to update your address is in your %signature% message variable (if you have one set up). If you don't this variable set up in Campaigns> Edit Message Variables, then you don't have anything else to change.
- If you need to edit message variables, see the step by step instructions below in "How to edit or create new message variables?".
How to change the "from" email address in my emails?
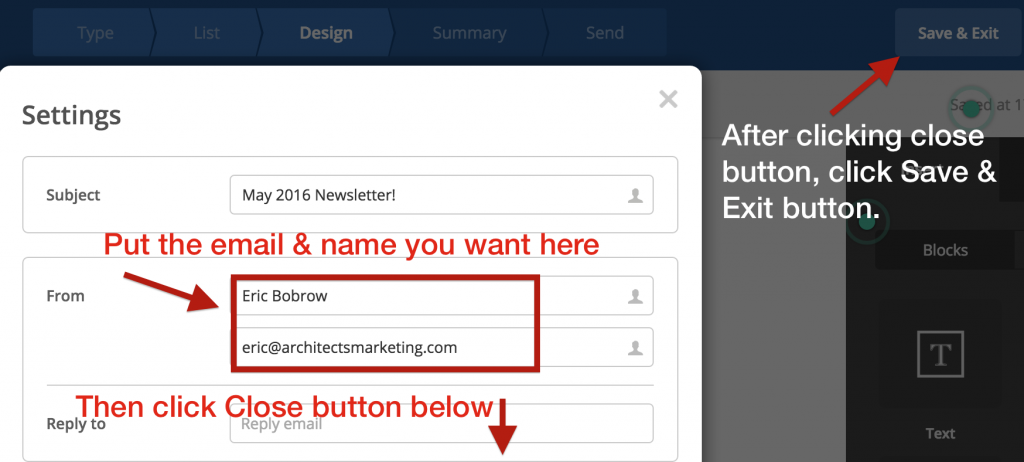
- Go to Campaigns and open the email that you want to change the email address for.
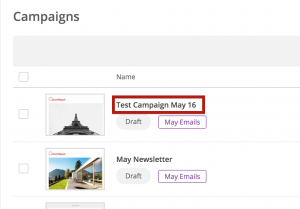
- In the summary area, click the “Edit” button next to “Subject”.
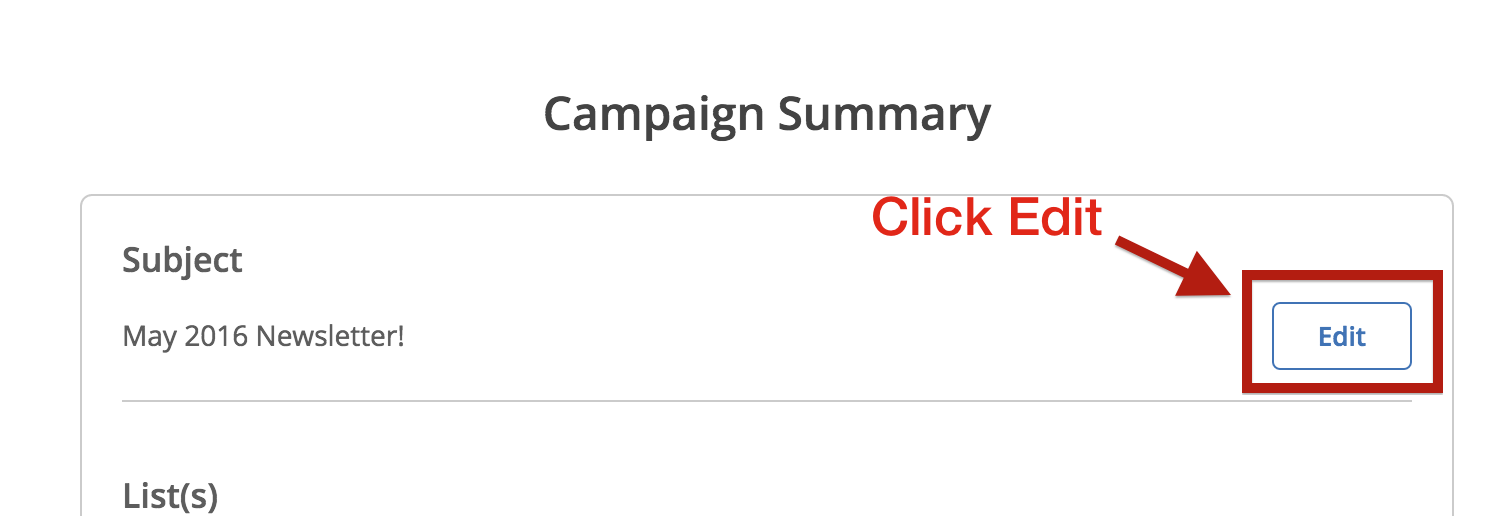
 You’re not changing the subject line but this is how you access the email address and other information.
 - In the email settings, change the email address to what you want the from address to be. Then click the close button at the bottom. Once this popup is closed, click the “Save & Exit” button at the top right.
How to edit the Done-For-You emails in the automations?
How to edit or create new message variables?
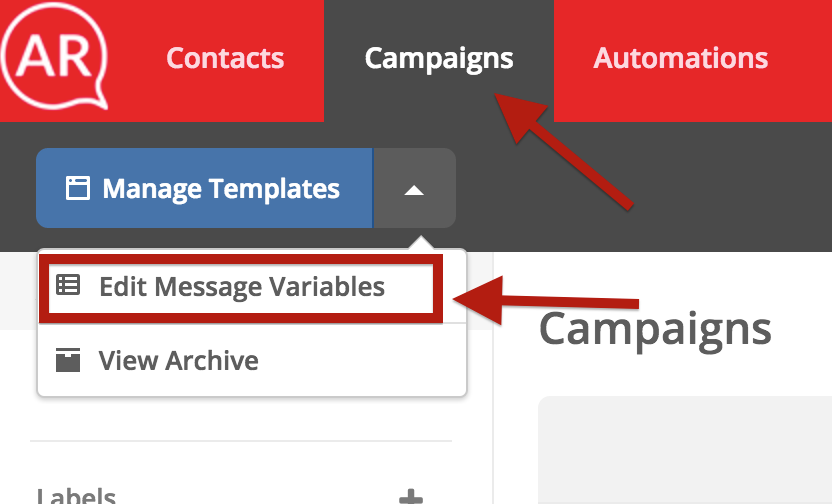
- To edit or create new message variables, go to Campaigns and then click on the down arrow next to Manage Templates.
- In the dropdown that appears, click on “Edit Message Variables”.
- To modify an existing message variable, choose the variable and then click the Edit button.
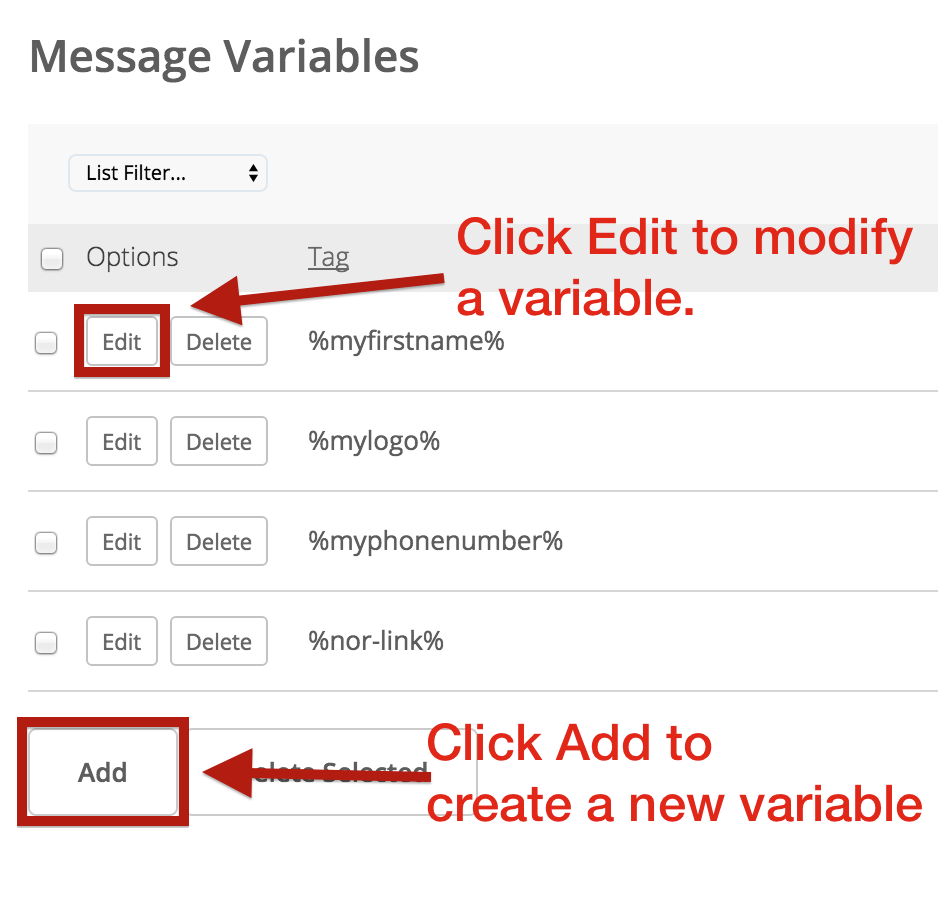 To create a new variable, click the Add button.
 - Add/Edit the name of the variable and its tag.
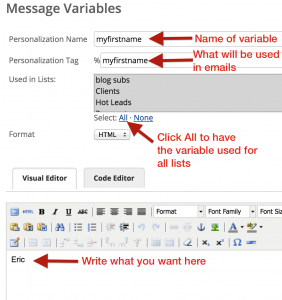 The tag is what goes in your emails %messagevariable% and should have no spaces or other symbols in it.
 - Choose which lists you want the variable to be available for. Its best to choose “All”.
- In the visual editor below, type or paste in whatever content you want the variable to be a placeholder for. You can also add images by clicking the image icon in the editor toolbar.
- Once you’re done, click the “Update” button at the bottom.
How to Opt-in your old or offline contact list?
What’s an opt-in? This means that all of your contacts must have willingly given you their email address, with the knowledge that they would be added to your list and receive mass emails from you. Usually, contacts sign up using an online subscription form.
How to get your contacts to opt-in? Well, who’s on your list that didn’t meet the import rules in my previous email? Were they past clients, social media connections, people you met at a tradeshow? Depending on what your relationship is, determines the best method to use to ask them to join your list.
If your contacts are past clients that you haven’t not kept in touch with or anyone that you haven’t emailed in the past year, then you should send them a personal email with a short message asking if they’d like to receive your e-newsletter. Here's an example letter.
This example email also works for contacts you met at a trade show, you’ll just need to modify the language a bit to make it a better fit. If your contacts are social media connections then you can send them a message directly on that social media platform (Linkedin, Facebook, Twitter, etc). Keep it short and to the point, for example:
Now, you’ll have noticed that both examples have a placeholder for a link to a signup form. You already have this set up for you in your AR account. Here’s how to find it:
- Log in to your ArchReach account
- Go to “Forms”.
- Look for “Newsletter form” and click on it.
- You’ll see the form and then in the upper right corner a button that says “Integrate”. Click this button.
- Now you’ll see a heading that says “integrate your form” and under this you’ll see 3 tabs. Click on the one that say “Link”.
- Copy the link you see in the box. This is the link to your newsletter form.
- Paste this link into your email/message where indicated.
When people click the link and complete the form, their contact information will automatically be added to your Newsletter and Prospects lists in your ArchReach account. They are now considered “opted in”.
This is a manual process and can take some time, but it’s not so daunting if you do this for a few minutes each day. If you want to speed things up, there is a way to do this with many (up to 50 contacts at a time only) contacts using Word and Outlook.
For more FAQs and tutorials, click on a section below or browse through the articles.
